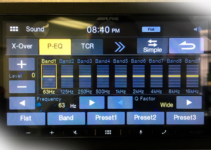
When we talk about the concept of “equalizing” the sound of a device, it is simply to adjust the way the sounds you want to play are emitted. This article will show you the best equalizer settings for bass, and so much more.
In some sound equipment, there are knobs that can go up and down, and the sound you are listening to is changing; this adjustment is known as equalizing.
The equalization of the tones has to do with how to find a balance so that the melodies are differentiated and enhanced correctly and at the right point. The combination of the three tones (low, medium, and high) will make a song, a chorus, or even a politician’s speech sound better. Let’s get into it.
When to Use EQ: Corrective And Creative Application
EQ can be applied in two different – but equally useful – ways: corrective EQ and creative EQ. Let’s look at each.
Corrective EQ
Corrective EQ allows you to remove unwanted elements from a recording such as hiss or vibration. But be careful: overusing corrective EQ can make your sound unnatural or distorted. We recommend that you always try to get the best possible recording before your EQ.
For example, rooms without acoustic treatment cause frequencies to resonate unpleasantly. So, microphones pick up the resonance and cause feedback. Corrective EQ is a great solution for removing feedback from your mix-it allows you to trim and remove the resonant frequency.
Creative EQ
On the other hand, creative EQ allows you to:
- Correctly position each instrument in your mix.
- Accentuate the good elements of a sound by accentuating them.
- Create a sense of distance (near or far elements of the mix).
- Modify, reduce and increase the presence and size of a sound.
Beyond The Three Basic Tones

https://emastered.com/blog/best-equalizer-settings
When we talk about sound in devices, we must understand that each tone that comes out of the speakers of any device has a channel through which sound waves pass. These channels are better known as frequencies.
To put it more simply: when you listen to a song, the singer’s voice comes out on one frequency, the stringed instruments on another, and the percussion instruments on a different one.
So, each of these channels can be adjusted to boost the frequency you want. The whole thing, then, goes from having only three tones (low, medium, and high) to being a composition of several frequencies that can be adjusted to what is known as equalization.
That’s when you, as a user, see all those lines going up and down when making sound adjustments to boost or modulate any of the components of the song (vocals, strings, percussion) to make it sound better.

https://www.headphonesty.com/2022/03/best-spotify-equalizer-settings/
Equalization For Each Musical Genre
As we said above, each music genre has different channels that can be adjusted; each channel is measured in Hertz – the most traditional sound measurement -.
As always, the devices are there to help you. As for the sound equalization, you can search by default for the best balance of frequencies depending on the type of music you want to listen to. So, the devices accommodate these channels according to the genre.
However, the music you are listening to also has an influence. Not only do the natural sounds of the track respond uniquely to different levels of equalization, but in the case of digital music, you may also have to cover for the imperfection introduced by certain file compression formats that can affect the overall audio quality.
So, we could say that EQ serves an invaluable role for anyone serious about their jams. With it, you could bring out the distinctive sparkle of high-hat cymbals otherwise drowned out by an overbearing vocal track or even help smooth out the narrator’s voice in an audiobook.
Try it! Start playing music you’re familiar with, crank up your EQ and move a few sliders up or down to hear what you’ve been reading in action. You’ll soon discover that small adjustments can have a pretty wild effect on how things sound.
Almost any professional sound engineer will tell you that the first thing you want to try with EQ is to lower the level of one frequency, rather than boosting others around it. Expanding too many frequencies can make music sound muffled, and with a little change here and there, you can subtract some of the annoying sounds and get closer to what you’re looking for.
That’s not to say that an increase in a frequency range isn’t sometimes necessary, but you should always start with subtraction.
Remember that any changes to the EQ will not only affect the frequency range you have chosen, but also the way the rest of the frequencies interact with each other.
You may notice that it takes a moment after adjusting to hearing the result. This is normal. It is also normal to have to increase the overall volume after reducing frequencies.
For example, if you want more bass and treble overall, you might turn down some of the midrange sliders, then increase the volume a bit and see what you think of the result. Not exactly, right? Then it’s time to get more focused on your settings, and for that, you’ll need to know what each frequency sounds like.
Don’t worry! We’ll give some instructions on how to approach things.

https://www.headphonesty.com/2022/03/best-spotify-equalizer-settings/
Best Equalizer Settings For Bass: Settings And Recommendations
Trust your ears when making equalization adjustments. Presets will never be perfect, and you should consider them as starting points.
There are many factors in making music sound perfect that you should always consider experimenting with any preset.
Before we get into how to EQ a bass, you should know that the bass has energy, punch, and articulation. So, make sure it doesn’t lose any of its virtues.
Bass exists between approximately 20 Hz and 200 Hz. Each musical note corresponds to a frequency. So, if you want to maximize your music with deep bass, you should adjust your equalizer within the 20-200 Hz range by increasing the decibels (dB). Of course, this is still quite a wide range, so we’ve broken it down according to your musical needs.
For example, Hip-hop bass lines start at 60 Hz. This range is where bass-heavy synth pads usually sit, along with heavy kick drums and bass guitars.
Unless you have a high-quality subwoofer, you may want to cut or reduce frequencies below 50 Hz, as this is where it tends to sound muddy.
This “sub-bass” region is generally reserved for the guttural and eerie sounds of action and science fiction movies. Here are some settings you could try.
- Cut what you don’t want instead of boosting what you do want. If you want to boost the bass on your favorite rock album, your initial instinct will be to increase the low end-setting (e.g., 100 Hz). However, you usually get better results by trimming the other settings and leaving the 100 Hz setting in a neutral position.
- Boosting frequencies is more likely to add distortion to the audio, especially if you boost a frequency range by a considerable amount. Frequency clipping is much less likely to cause distortion. So, to boost the bass at 100 Hz, leave it in a neutral position (or only boost it slightly), and clip the sub-bass at 30 Hz and the high-mid sounds at 1 kHz.
- Identify the frequency range of common instruments and vocals. Once you have mastered the basics of adjusting the sliders or control points of your EQ, you will be able to make more precise adjustments to bring out a particular instrument or voice.
- With practice, you will know where to look for a particular instrument or voice in the frequency range. But until then, be guided by charts such as the following:
- Female voices: between 150 Hz and 1.6 kHz.
- Male voices: between 60 Hz and 500 Hz.
- Saxophone: between 100 Hz and 700 Hz.
- Guitar: between 70 Hz and 1.1 kHz.
- Cymbals: between 200 Hz and 10 kHz.
- Drum kit: between 60 Hz and 4 kHz.
- Piano: between 25 Hz and 4.5 kHz.
- If you still want to boost rather than cut, pay attention to the clipping indicator on your equalizer, which is usually included in any software or hardware equalizer. If the clipping light is flashing, you may need to reduce the amount you have boosted the bass.
- Equalizers can be a great way to give your bass an extra punch, but that setting won’t work well with all genres. Acoustic songs avoid those low frequencies and instead operate in what’s called the “low-mids,” which range from 250 Hz to about 1500 Hz.
- Setting the low-mid frequencies for acoustic music requires a lot of care and precision. The low end of most instruments is in this range, so too much boost/cut can cause too much noise or overload.
Now, here are some recommendations:
- Don’t overdo it with audio equalization. The equalizer can compensate somewhat for the shortcomings of your audio equipment, but remember that professional engineers, along with the artist’s recommendations, have already balanced the equalization before producing the recording.
- Start with the volume of the speakers in the mid or lower range before you begin to modify the EQ. Boosting frequencies while the speaker is at high volume can cause damage to the speakers or you’re hearing.
Final Words
Based on what we read, we can say that it is important to avoid giving up on the quality of the bass-heavy music you listen to. Buying high-quality headphones and speakers won’t do you any good if you don’t get the best bass boost equalizer settings on your device.
![Best Equalizer Settings for Sony WH-1000XM4 [Top Tips]](https://settingsbase.com/wp-content/uploads/2023/02/Eqff-211x150.jpg)
