A good photographer knows angles and how the individual(s) in a picture are positioned aren’t the only things that matter in taking a very good picture. Another thing could include the sight the photographer wants to capture.
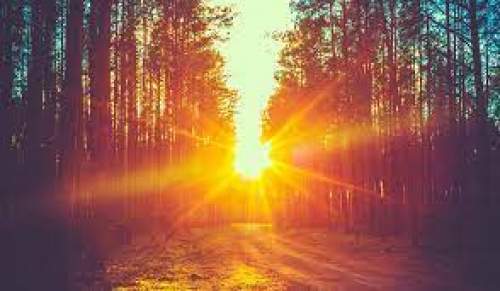
Golden hour portraits have managed to capture not only a moment in time but also the feel of it. How the sun as it sets or rises, settles on the skin of the client and reflects around it.
It always brings out the best soft colours which make a portrait or landscape photo warm and naturally beautiful.
What is the Golden Hour?
Golden hour is the moment just before the sun sets and after it rises. This period lasts for only an hour… hence “the golden hour”
The golden hour, especially as the sunsets is a beautiful sight that a lot of people sit on their rooftops or the top of a towering building just to watch
All this and more is why the moment is so special so why not capture it in a picture and make it everlasting.
Best Camera settings for Golden Hour Portraits
The best camera settings to fully make use of the golden hour varies and this depends on the photographer and what it is looking to achieve.
For portraits, the photographer’s aperture should be set low and can be adjusted between f/1.8 to f/3 till what is desired is achieved. For landscapes, the aperture setting should be adjusted f/8- f/22 until the desired effect is met.
Another thing to note is the shutter speed setting which for good measure shouldn’t be more than 1/60th. The ISO; which is the camera’s sensitivity to light, should start as low as 100 or 200 and moved up as the sun goes down. It can go up to about 800. Anything more than that could ruin the picture.
The spot metering is another thing to check. Spot metering tells the camera to narrow to the point you pick instead of the whole scene. Although most cameras have a spot meter setting that works well on what scene you choose, one can still adjust to its fitting
Adjusting the white balance to cloudy is also important as it will warm the picture’s tones
When shooting during golden hour, one should remember it’s going to be a low light scene, and having a tripod would come in handy
Some Tips for Taking Good Golden Hour Pictures
The golden hour only lasts for a short time and its always best to maximise such time as quickly as possible and to accomplish that are some tips below
Time
Getting there on time is always a bonus. To make use of every moment of the golden hour, it’s best to arrive at your location an hour before. You can use calculators like the Helios golden hour calculator or the Photographers Ephemeris.
They’d help you calculate when the sun would set. That way you can be there on time to make out of a beautiful hour.
Another reason to get up on time is to avoid crowds. It will still be quiet (and maybe clean) and one can honestly feel the calm in the picture it’s taking.
Settings
Adjusting the settings to the right mode would enable you to get those beautiful shots. To make the best use of the backlighting, set your camera to manual mode or for the aperture that has spot metering (which most DSLRs have a shortcut for) or set it to semi-manual mode.
Shadows
Shadows can either be beautiful in a picture or not. It depends on how a photographer can make it work. But shadows like yours could influence the picture. So, position the camera and if you see your own shadow or shadows you don’t want, reposition yourself and/ the objects causing it.
A way to make good use of the shadows is long shadows which are there because of the position of the sun. They add details like a tree and balance (the orange-yellowy colour against the darker shade of shadows) to the picture you’re taking making it alluring.
Check and Check Images
Checking every image after a shot is important. And this is important because of how quickly and drastically the light changes during the golden hour. And such changes could leave your image underexposed. To counter this, adjust the f-number aperture i.e. from f/4 to f/2.8.
A wide aperture allows more light into the camera which results in a photographer creating a better exposure
Lens flares
Because of how beautiful the golden hour is, a lot of photographers would want to add it to their portraits. A good way to capture the rays of the sun is to include lens flares in your picture.
Adjust the client to have their back to the sun but not completely then try to balance the backlighting with the exposure depending on how it reacts to the client’s skin
If this doesn’t produce the desired effect, using a flash would come in handy. Once this is set, make sure the sun rays are looking right at you through your viewfinder and begin taking the picture (as much as you can) while moving towards the side
Conclusion
In summary, adjust the camera to full manual mode, point it at the sky and check the spot metering and to your specification, adjust ISO, aperture, and shutter speed.
The golden hour is a beautiful time to take amazing pictures with the most natural of lightings. So, pick your spot, get there on time, adjust your settings and start clicking away. Take as many pictures as you can. The golden hour can only last for so long.


)