Many photography lovers think that photos do not need to be retouched, that just as they came out of the camera, they retain their purity. In digital photography, this translates into obtaining a jpg image that the camera stores on the memory card.
In these cases, the digital camera captures the image captured by the sensor. Then, the file is assigned a profile with preset values for sharpness, contrast, brightness, hue, and saturation to deliver a final picture to the memory card. These preset profiles are known as Picture Controls in the Nikon camera world. Here, we’ll show you the best Nikon picture control settings.
What Are Picture Controls?
What makes the Nikon look the Nikon look is the Picture Controls. Most digital cameras have some Picture Controls that you can select to give your photos a different look. However, it is essential to note that you must choose the picture control before taking a photo.
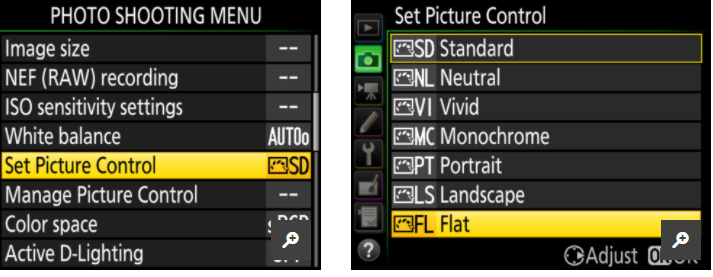
So, picture controls refer to multiple preset profiles designed to optimize multiple photo elements, such as clarity, brightness, saturation, and many more. For videographers or photographers shooting in JPEG format, choosing the proper Picture Control can be critical because these settings will be an “inseparable” part of the file after taking the picture. The seven presets that come with Nikon are Standard, Neutral, Vivid, Monochrome, Portrait, Flat, and Landscape.
The Ultimate Customization
Mid-range cameras and upwards allow the creation of Picture Controls customized to the user’s taste. This opens a world of possibilities.
One of the fascinating uses of custom Picture Controls is integrating a preset for a flat image. The possibilities this offers for video are tremendous since the file generated when we create a video with the digital camera is usually recorded with the Picture Control that has been chosen in the settings.
Picking The Right Look For Your Pictures
The different picture control settings give you the freedom to change the look of your image. For example, assume you like the way the photos are displayed in standard mode, but you want them to be a little sharper.
You can easily adjust each profile by right-clicking on the multi-selector when you have that image control highlighted.
So, you can make some tweaks to quickly change sharpness, clarity, contrast, brightness, saturation, and hue. To change the picture controls, press Menu and then under the shooting menu, highlight Set Picture Control and press OK now from the selection on the menu, choose a picture control, and press OK.

Nikon Picture Control Setting
| PICTURE | CONTROL DESCRIPTION |
| STANDARD | Standard mode is a popular choice, as it allows for balanced images with a little more impact. |
| NEUTRAL | A good choice for photographs to be further processed or retouched, this option uses minimal processing for natural results. |
| VIVID | Choose this option for photographs where you want to accentuate the primary colors. Images are enhanced for an intense photographic print effect. |
| MONOCHROME | Monochrome mode allows you to create a black and white version of the photo. |
| PORTRAIT | Portrait mode uses the same basis as the Neutral profile; however, it helps skin tones look more realistic. Even if there are no people in the scene, Portrait mode allows you to get more detail in the shadows and colors a little more highlighted. |
| LANDSCAPE | Produces vibrant natural and urban landscapes. Landscape mode allows for more graphic files than Standard but is more subdued than Vivid mode. |
| FLAT | Choose this option for photographs that will later be extensively processed or retouched. Details are preserved in a wide range of tones, from highlights to shadows. |
Customized Image Controls
While you can make minor adjustments to the default Picture Control profiles, what do you do if you have a specific look or editing style that you want to apply to all your photos? In that case, you can create your custom Picture Control.
To do this, you’ll need to download Nikon’s free Picture Control Utility 2 software that runs on Mac and Windows-based PCs. Once downloaded, you will have the option to customize the look or style through the following options:
- Sharpness
- Clarity
- Contrast
- Saturation
- And add a custom Curve
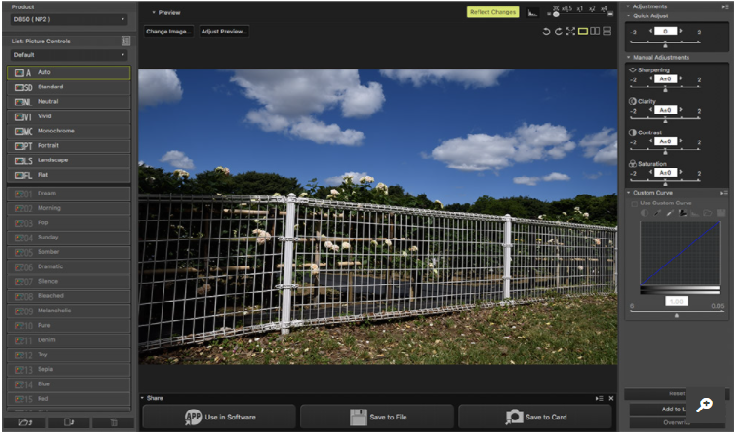
After implementing these changes, you can simply press ‘Save to Card’ and the custom profile will be saved to the memory card you’ve connected to your laptop or desktop computer.
After it has been saved, remove it and insert it into your camera as per usual. Then, go to Manage Picture Control in the Shooting Menu. Go to Load/Save and select the new Picture Control you created. From then on, you will have access to this personalized profile when capturing images or videos. This customized profile will come in handy when you are outside and can’t use your computer to edit pictures.
Modifying Picture Controls
Picture Controls can be modified to suit the type of scene or the user’s creative intentions. Choose a balanced combination of settings using Quick-Adjust, or manually set each setting.
- Select a Picture Control
Highlight Set Picture Control in the shooting menu and press 2. Highlight the desired Picture Control and press 2.
- Set the settings
Press 1 or 3 to highlight the desired setting and press 4 or 2 to select a value in increments of 1 or turn the command dial to select a value in increments of 0.25 (0 Picture Control settings; available options vary depending on the Picture Control selected).
Repeat this step until all settings have been configured, or select a preset combination of settings by using the multi selector to select Quick Set and pressing 4 or 2.
- Save the changes and exit
Press J. Picture Controls modified from the default settings are indicated by an asterisk (“*”).
Picture Control Settings
| QUICK ADJUSTMENT | Decrease or increase the effect of the selected Picture Control (note that this resets all manual settings). Not available with Picture Control Neutral, Monochrome, or Flat. |
| SHARPNESS | Controls the sharpness of the outlines. Select A to automatically adjust sharpness according to the type of scene. |
| BRIGHTNESS | Adjust the brightness manually or select A to allow the camera to adjust the brightness automatically. Depending on the scene, shadows may appear around bright objects or halos around dark objects with some settings. Clarity does not apply to videos. |
| CONTRAST | Adjust the contrast manually or select A to allow the camera to adjust the contrast automatically. |
| SATURATION | Controls the intensity of colors. Select A to adjust saturation according to the type of scene automatically. |
| FILTER EFFECTS | Simulates the effect of color filters on monochrome photographs (0 Filter Effects (monochrome only)). |
| CHANGE OF TONE | Select the tint used in monochrome photographs (0 Tint shift (monochrome only)). |
RAW Image Processing
Almost all Nikon cameras have built-in Wi-Fi. So, it is becoming increasingly common for people to share HQ photos from their Nikon cameras on Facebook, Instagram, and other social networks, right on the go.
Previously, many photographers capturing in RAW format did not take full advantage of this feature, believing that a computer was necessary to edit their files properly. However, thanks to the built-in RAW file processing that almost all Nikon cameras have, this is no longer the case.
When in playback mode, you can press the ‘i’ button, select PHOTO RETOUCH, and then RAW PROCESSING to access several multiple options to edit your photos, e.g., Picture Control.
This is an excellent opportunity for photographers shooting in RAW format to edit their pics and videos straight on the camera, allowing them to get the colors and look they want before sharing their photos with the world.
Also, for the latest models, if you have multiple images you want to edit, you can select Batch processing and edit them simultaneously. By combining all of this with the custom image controls, the photographer shooting in RAW format will be able to edit a pic on the go and get it ready to share without having to use a computer. On a long trip, this can be an indispensable feature.
Whether shooting JPEG, RAW, or even video, using Picture Controls to improve your final product is definitely worth considering.
What if you shoot RAW and don’t use the video capabilities of your Nikon camera? How can you benefit from the Picture Controls?
Well, Nikon’s View NX-I and Capture NX-D software use all your camera’s settings, such as vignette control, distortion control, Active D-Lighting. Also, can seamlessly read RAW images controls.
This means that when you want to edit your files with Capture NX-D, the same file you saw on the back of the camera will already be ready in the software, which keeps your workflow uninterrupted. In a non-destructive way, you can observe what an utterly different Picture Control would look like.
For example, if you captured an image embedded with a Neutral Picture Control and then want to change it to Vivid or another Picture Control.
Final Lines on Best Nikon Picture Control Settings
As we can see, Nikon cameras allow us several photo control settings so that you can customize your photos. And get the most out of each of them. Now, it’s up to you to make the most of it and become the best photographer you can be.
More Post for You:
