The Eclipse IDE often needs to be connected to the internet for updates. Also, the right proxy settings are essential. A PC with a proxy server may hang Eclipse, it could even fail to load completely. For a smooth operation, you must configure the proxy in Eclipse.
Best Eclipse Proxy Settings
There are several ways for this configuration. You can use any of the Eclipse proxy settings that will be revealed in this guide. Keep reading.
How to configure proxy settings in Eclipse
Method #1
At the bottom of eclipse.ini, add the proxy settings in quote below:
- “Dorg.eclipse.ecf.provider.filetransfer.excludeContributors=org.eclipse.ecf.provider.filetransfer.httpclient
- -Dhttp.proxyPort=9443
- -Dhttp.proxyHost=squid.jkebanking.net
- -Dhttp.proxyUser=clmadmin
- -Dhttp.proxyPassword=clmadmin”
NB: In case there is no need for authenticating the proxy server, ignore the http.proxyUser and proxyPassword.
When you are done, add org.eclipse.core.net.prefs to where you see <workspace>\.metadata\.plugins\org.eclipse.core.runtime\.settings.
Next, the content of org.eclipse.core.net.prefs should have the settings in quote below:
- “systemProxiesEnabled=false
- proxiesEnabled=true
- proxyData/HTTP/host=squid.jkebanking.net
- proxyData/HTTP/hasAuth=true
- proxyData/HTTP/port=9080
- eclipse.preferences.version=1
- proxyData/HTTPS/port=9443
- proxyData/HTTPS/hasAuth=true
- proxyData/HTTPS/host=squid.jkebanking.net
- org.eclipse.core.net.hasMigrated=true”
Method #2
Follow these steps:
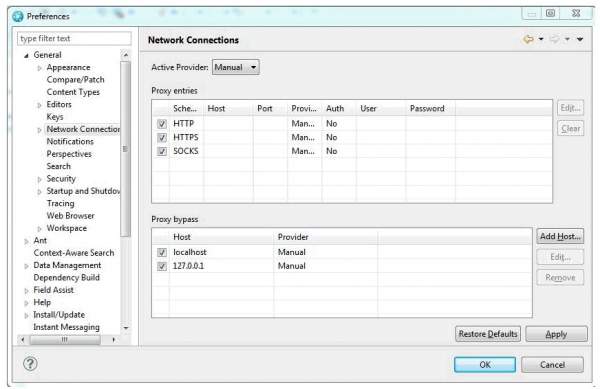
- At the Eclipse IDE, choose Window then select Preferences.
- In the Preferences box, select Network Connections.
- Next, choose Manual from the ‘Action Provider’ drop-down list.
- Choose “Http” on the list. Click on Edit.
- Next, fill the proxy server host plus the port number.
- Finally, click on Ok.
With this settings, Eclipse will connect to the internet and also pass through the proxy server.
Method #3
First, pay attention to this. Where a proxy is connected to the internet is the area to specify the proxy in Eclipse. Make sure that the proxy settings here match with that if the Internet Explorer’s
Now use the following settings to set a proxy:
- At the Eclipse menu, select Window. Next, choose Preferences, allow the dialog box to appear.
- Next, select “General”. And click on Network Connection.
- Choose “Active Provider”. Select “Native” if available and click on Ok. For values different from the proxy settings for Internet Options, use”Manual” as the Active Provider.
- Next, choose “HTTP in the Proxy Entries tab and click the Edit button.
- Now fill in the Host, Port, and Authentication field. Then click OK.
- Finally, click on “Apply” or “OK”. Your settings will be automatically saved.
Method #4
This is for the recent version of the Eclipse.
Use these proxy settings:
- Launch the Eclipse and head to Window. Next, select Preferences and then choose General. Click on Network Connections.
- Now change the Active Provider to “Manual”.
- Choose HTTP then click on the Edit button.
- Input the IP Address and Port Number above the HTTP field.
- If there is a need to use the authenticate the proxy, just choose Requires Authentication.
- Next, input your Username. If the authentication is on the Windows domain, there might be need to prepend the domain name. Then add a backslash (\). For example: MYDOMAIN\MYUSERID.
- Input the password.
- Click Ok, then Apply.
The settings should allow you to browse with the internal web browser, especially for the HTTP URLs.
Using any of the methods outlined above should give you the best Eclipse proxy settings. Try them today. Good luck!


 2021)