Looking for the Netgear Nighthawk X6 best settings? Then you can keep reading the rest of the post.
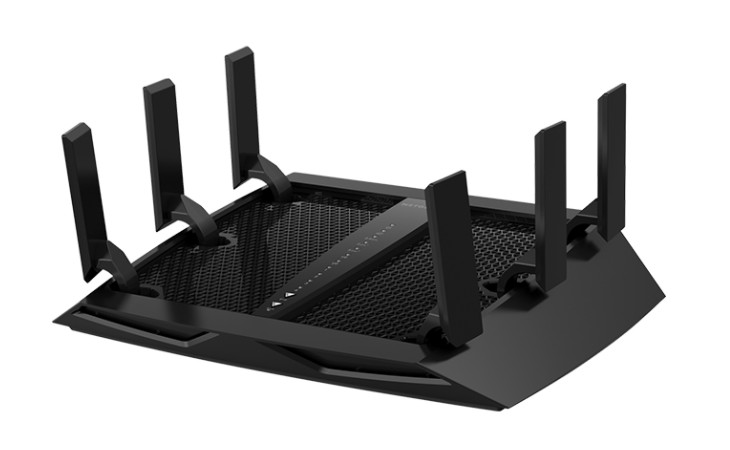
Netgear is one of the leading brands in providing networking gadgets. They are specifically known for their industry-standard routers. A few years back, they released the Netgear Nighthawk AC3200 Wi-Fi Router (R8000).
It came with all the latest features of Netgear. And, it was a pricey router as well. Netgear promised the best performance out of the box with this router.
However, many users reported that this router is not performing up to its caliber. As a result, they are looking for the best settings for their Netgear Nighthawk X6 router.
We have jotted down this post with a few effective settings for the said router to remedy that. Along with that, we will also share a few tips on how you can improve the performance of your Nighthawk X6 router.
So, let’s cut to the chase…
How to Setup Nighthawk X6 R8000?
Before we can share the best settings for the Netgear Nighthawk X6 R8000, we need to tell you how to set up the router properly. So that you can expect great performance from it. Lucky for you, it is effortless to set up the Nighthawk X6.
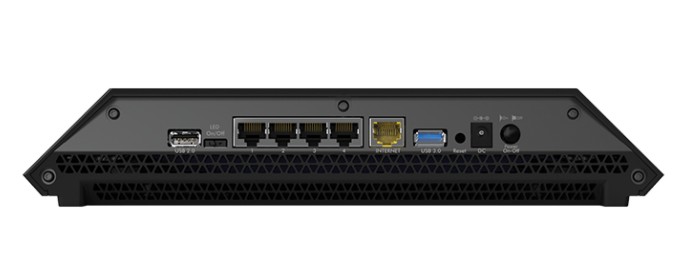
As usual, connect one end of the Ethernet cable to the modem you have bought or provided by your ISP. Then, connect the other end of the Ethernet cable to the router properly.
Next, connect the router to the power outlet using the power adapter. Also, you need to connect the modem to the power outlet if you haven’t already.
Next, you can turn on the router and wait for a bit. It is better to wait for a minute as the router will set up everything on its own. Next, you can log in to your Netgear router. There are many ways you can log in to the router, such as via the Nighthawk app or using a web address.
The easiest way is to use the web address method. To do that, you can open your favorite browser on a device (PC/smartphone) that is connected to the internet via the Netgear router. Then, visit routerlogin.net or http://192.168.1.1 from that browser. In doing so, you will see the router login display. Here, you will need to provide the username and password.
Normally, the username would be admin. And, the password would be the one that you have entered during the first setup. Or you can find the login details (username and password) for your particular router at the back of the router. So, enter the correct login credentials and log in to the router settings home page.
At first, you will be on the ‘Basic’ router settings page. From there, you can customize a lot of options related to the network settings of your Netgear Nighthawk X6 R800 router. Let’s customize the router settings a bit so that you can start using them right away.
Steps to Follow
- First of all, click on the ‘Advanced’ tab from the top of the screen.
- Next, click on the ‘Setup’ option from the left sidebar, which will bring out a dropdown menu.
- From the dropdown menu, click on the ‘Wireless Setup’ option.
- Now, you will find a ton of options on the main panel of the screen.
- Next, you can name your Wi-Fi network as your liking on the Name (SSID) section. Remember to avoid sharing sensitive information while naming your network.
- After that, you need to select the WPA2-PSK [AES] option under the ‘Security Options’ section.
- Then, you need to set a strong password in the ‘Password (Network Key)’ option.
- Last but not least, you need to click on the ‘Apply’ button at the top of the screen to save all the new settings.
After you have changed the settings on your router, you will need to reconnect all the devices to your newly set Wi-Fi network.
Netgear Nighthawk X6 Best Settings
At this moment, you know how to set up your Netgear Nighthawk X6 router.
But now, we will share some important settings that you need to tweak to get the best performance out of the router. In this case, you will need to customize the settings on your router and your PC (Windows). So, let’s go…
Customize the Network Settings on Your Windows PC
- First of all, you need to connect your PC to the Wi-Fi network shared by your router if you haven’t already.
- Next, right-click on the ‘Network/Wi-Fi’ icon from the taskbar.
- In doing so, a few options will appear. From those options, select the ‘Open Network & Internet Settings’ option.
- Then, click on the ‘Wi-Fi’ option from the left sidebar.
- Next, click on the ‘Change adapter options’ from under the ‘Related settings’ section.
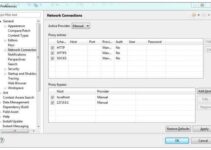
- In doing so, all the network connections on your PC will appear.
- From there, double-click on the Wi-Fi connection that is from the Netgear Nighthawk X6 router. If there are multiple connections, you can do that one by one. So, start with any of the connections.
- At the moment, a popup window will appear. And from that pop-up windows, click on the ‘Properties’ option.
- Then another popup window will appear on the screen. Next, click on the ‘Configure’ button from there.
- In doing so, another popup window will appear. From that window, you need to select the ‘Advanced’ tab.
- From there, make sure the ‘802.11 a/b/g Wireless Mode’ is set to dual-band. However, if you are going to use the router for your desktop computer only, then you can set it to 5 GHz only.
- Next, on the ‘802.11 n/ac Wireless Mode’, you need to select the ‘802.11ac’ option.
- For the ‘Channel Width for 4 GHz option, you need to select the ‘Auto’ option.
- You can also set the preferred band to the ‘Prefer 5Ghz band’ option.
- Then, you need to select the ‘Highest’ option to the ‘Transmit Power’ option.
- Finally, you have to click on the ‘OK’ button from the bottom of the popup window to save all these settings
That is it. There is nothing to change it on the PC. Now, we will show you how to use the best settings on your router. Here we go…
Customize the Network Settings on Your Router
- As usual, go to the router settings web page of Netgear on your favorite browser from a device that is connected to your router’s Wi-Fi network. The site is 192.168.1.1 or routerlogin.com or routerlogin.net. You can use whichever you want to.
- Next, you need to enter the username and password of your router admin page and click on the ‘OK’ button.
- Once you are on the homepage of the router settings, click on the ‘Wireless’ option from the left sidebar of the screen.
- Then, set all the speeds to the maximum value on the ‘Mode’ settings.
- Also, don’t forget to click on the ‘Apply’ button at the top to save these settings.
- Now, you need to click on the ‘Advanced’ tab from the top of the screen.
- Next, go to the ‘Advanced setup’ option from the left sidebar of the screen.
- Then click on the ‘Wireless Settings’ option from the dropdown menu that will appear on the left sidebar.
- Now, if you are going to use the 2.4 GHz band, then you should disable the ‘Enable 20/40 MHz coexistence’ option.
- After that, scroll down and enable the ‘Enable Airtime Fairness’ and ‘Enable MU-MIMO’ option from the bottom of the screen
- You can also disable the ‘Enable Router’s PIN’ option if you prefer.
- As usual, click on the ‘Apply’ button from the top of the screen to save these settings.
That is it. You have now configured your router with the best settings that will offer higher speed and less interference. All in all, you could say that these are the Netgear Nighthawk X6 best settings.
Tips on Setting up The Nighthawk X6 Best Settings
You know how to set up the Netgear Nighthawk X6 router with the best settings by this time. However, if those settings don’t improve the performance of your router, then we have come up with some useful tips for you.
In this section, we will share some tips that you can apply to improve the performance of the Nighthawk x6 R8000 router.
Update the Firmware
Normally, every router has its own firmware. The manufacturers release new updates to the firmware of a router regularly with improved features and performance.
As a result, you should always upgrade your router firmware if there is an updated firmware version available. That way, you can be sure that your router is performing to its highest potential.
Downgrade the Firmware
Believe it or not, sometimes, a new firmware update could come with bugs or issues. And, once you have upgraded the firmware of your router, you will start to notice that the performance of your router has got worse.
So, in that case, your best bet is to downgrade the firmware to the previous stable version. By doing so, you can expect improved performance from your router.
Enable/Disable Smart Connect
You will find a setting named ‘Smart connect’ on the admin page of your Netgear router. With this enabled, your router will automatically select the best Wi-Fi band for your connection. However, this setting could be an issue for your router to provide its best performance. As a result, you should disable this setting.
To do that, go to the admin page of your Netgear router at 192.168.1.1. Then go to the ‘Wireless’ option from the left sidebar under the ‘Basic’ tab. Then, you can enable/disable the ‘Smart connect’ setting from the main panel. Lastly, click on the ‘Apply’ button to save this setting.
Disable Bandwidth Limiter
Typically, not all Netgear routers come with a bandwidth limiter option. If your one comes, you should check whether it is activated or not. If activated, your internet speed will be limited. So, you should disable that to get the best out of your router.
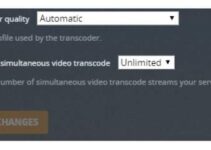
Disable QoS
QoS or ‘Quality of Service’ is a feature to selectively improve the quality of internet speed for online gaming or certain applications. However, this feature could also be slowing other devices on your network down.
As a result, you should disable the QoS feature if you haven’t already. By default, this feature is enabled on many Netgear routers. You can customize the ‘Dynamic QoS’ feature on the router’s admin page. To do that, navigate to ‘Basic> Dynamic QoS’ from the admin page and disable it.
Reset the Router to Factory Defaults
If none of these customizations of the settings work for you, you have another tip to try. That is to reset your router to the factory default. Depending on the model of your router, the method of factory resetting your router would be different.

So, refer to the instruction manual of your router and reset it to factory default. It should be helpful to improve your router’s performance. But once you have reset the router to factory default, you will need to re-connect all of your devices to the router once again.
Concluding Thoughts
Netgear Nighthawk X6 is a very powerful router. It also comes with a lot of advanced features. So, it could be a bit tricky to find the best settings for this router. If you are new to this and don’t know how to improve your router’s performance, you should follow all the tips we have shared above.
We hope this post will help you bring the best out of your Netgear Nighthawk X6 R8000 router. Then again, if you have any more suggestions or tips, you can share them with us in the comment section below. As always, don’t forget to share this post with others.
More Posts for You:
