The Rackspace email service is very compatible with the email client of Outlook. It is also so secure. A user of this email can access it from several operating systems like Android, Windows, and Mac. The perfect incoming mail connection for Rackspace email is IMAP, even though POP3 can also be used.
This guide shows you the best Rackspace IMAP settings. Keep reading.
Default Settings for IMAP
Configuring IMAP for any email client should be easy to fix. The IMAP settings will allow you to have a copy of your emails within the Rackspace account – this also means that you can use multiple email clients at the same time.
Below is the default setting for IMAP:
- Your Name – Your name or business name.
- Login Name – Your mailbox email address.
- Password – The password if your mailbox.
- Account Type – IMAP.
- Incoming Mail Server – secure.emailsrvr.com.
- Outgoing Mail Server – secure.emailsrvr.com.
- Incoming Mail Server (IMAP) TCP Port – 993 (SSL).
- Outgoing Mail Server (SMTP) TCP Port – 465 (SSL).
IMAP Setup for Rackspace Account
Here are IMAP and SMTP settings that allow you to access your Emailsrvr.com email account. Emailsrvr.com is the email hosting page for Rackspace. The settings are to be used on a desktop email program.
- IMAP Server: Use secure.emailsrvr.com.
- IMAP port: Use 993.
- IMAP security: Choose SSL.
- IMAP username: Enter your full email address.
- IMAP password: Input your Emailsrvr.com password.
- SMTP Server: Use secure.emailsrvr.com.
- SMTP port: Use 465.
- SMTP security: Choose SSL.
- SMTP username: Enter your full email address.
- SMTP password: Enter your Emailsrvr.com password.
Rackspace Settings for MS Outlook Mail Client
Follow these steps to configure tour MS Outlook mail client.
- Open Microsoft Outlook. You can use Microsoft Outlook 2016 or any.
- Click Next when it opens (that’s if you are launching this program for the first time).
- If you have been using Outlook, simply go to File and Click on Add Account.
- Click Yes on the option that allows you to set up and connect Outlook to an email account. Then click on Next.
- Choose either Manual Setup or Additional Server Types. Click on Next.
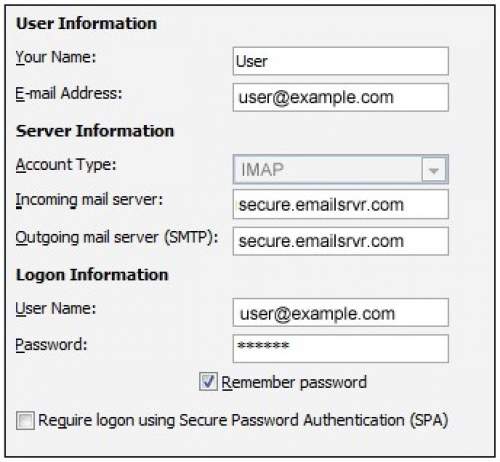
Enter these in the Add Account window that pops up:
User Information
- Your Name: Enter your name or business name.
- Email Address: Input the email address of your mailbox.
- Account Type: Choose IMAP.
- Incoming Mail Server: Use secure.emailsrvr.com.
- Outgoing Mail Server: Use secure.emailsrvr.com.
Login Information
User Name: Enter the email address of your mailbox.
Password: Enter the password of your mailbox.
- Once you have completed the above settings, click on More Settings.
- Switch to “Outgoing Server”. Then check “My Outgoing Server (SMTP) Requires Authentication”. Next, choose “Use Same Settings as my Incoming Mail Server”.
- You need to change “Use the Following Type of Encrypted Connection” to “SSL” for the two Servers – Incoming and Outgoing.
- Incoming Server (IMAP) port: Use 993.
- Outgoing Server (SMTP) port: 465.
- Click on OK. Then click on Next.
- At this point, Outlook attempts a test. It sends a text message using the configurations. If it was all well configured, the message would be successfully sent out. Click on Close.
- In the last step, close the setup wizard by clicking on Finish.
That’s it! You have just configured your Rackspace email account with Microsoft Outlook.
The IMAP settings for Rackspace email help you with the incoming messaging connection. You can also easily configure your Rackspace email with Outlook.


)