Rackspace offers several billed services. It offers databases, backup, monitoring, and email services. All these useful services save their customers money and time. The Rackspace email service is very compatible with the email client of Outlook. It is also very secure. A user of this email can access it from several operating systems like Android, Windows, and Mac.
The best incoming mail connection for this email service provider is IMAP while the SMTP settings work perfectly for the outgoing mail.
This guide discusses more the SMTP settings of Rackspace. Keep reading.
Settings for Rackspace SMTP email
The SMTP settings relate to the outgoing mail server. The protocol works just for outgoing messages. Many email softwares are designed to apply the SMTP in order to boost communication while sending an email.
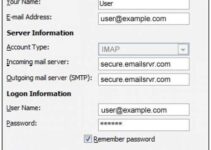
Below are the SMTP settings for Rackspace.
- Go to the settings tab.
- Next, input your first and last name – this is the name which would on the “From” field, especially for messages you sent.
- Now use your Rackspace email address – for example “[email protected]”.
- Email account pass: Use the password of your email account – that is, your normal email login password.
- Next, make sure that you choose SMTP from the list.
- Outgoing mail server – Use secure.emailsrvr.com.
- Server Port: Set this to 465.
- For the “Authentic Requirement”, choose Yes.
- Enter your email account username and password.
- For the SSL/TLS, select No.
Save your settings.
Setting for Rackspace IMAP
Without setting the IMAP, your incoming mailing server may have few defects. Follow the steps below to setup the IMAP of Rackspace.
- Click on the Settings.
- Next, input your first and last name. This name will show up in the “From” field of sent messages.
- Now type in your Rackspace email address in full, for example, [email protected].
- Enter your password. Use the password of your email account for this.
- Choose “IMAP” from the next field.
- Incoming mailing server: Use secure.emailsrvr.com.
- Server Port: Use 993.
- Authentication Requirement: Select Yes. Username and password of email account, use yours.
- SSL/TLS: Select No.
Save your settings. That’s it!
Rackspace Email Settings for IOS Device
Would you like to use the Rackspace email service on your IOS device? Use the settings below.
- Go to Settings from your home screen. Next, click on Mail.
- Click on Add Account, then tap on Other. Finally, tap on the Add Mail Account.
Use these details for the fields below:
- Name: Enter the name you want to appear on the ‘From’ session of mails you send.
- Address: Use your full email address. For example, [email protected].
- Password: Use the password of your email account.
- Description: Use what you like, it will be visible to only you.
- Next, choose IMAP. And add the information for both the incoming and outgoing mail servers. Use these:
- Host Name: type secure.emailsrvr.com.
- Username: Input your full email address.
- Password: Use the password of your email account.
- Finally, tap on Save. This automatically saves all the settings.
Setting Rackspace Email on An iPhone
This is straight forward. Follow the steps below:
- Click Settings from your device’s Home screen.
- Next, click Mail. Then click on Contacts, and then Calendars.
- Click on Add Account, then tap on Other.
- Tap on Add Mail Account.
Now input this information:
- Name: Use your first and last names.
- Next, tap on Save.
- Tap the IMAP option if IMAP is not selected yet.
The SMTP settings above, and also that of IMAP should help you have a quality email service from Rackspace.


)