After investing in a new state-of-the-art TV, we expect it to deliver the optimal picture promised by its long and complex specifications. However, this is not always the case. But don’t panic because before you can start enjoying your new screen to the fullest, you will need to calibrate some of its parameters.
You may be wondering how to do it. In general, it is a process that we can do ourselves without having to resort to third parties by following a few simple steps, as we are going to discuss below.
Philips 55PFL5601/F7 Best Picture Settings – What Is Calibration?
It must be calibrated for a display device – TV, monitor, projector – to look optimal after installing it at home.
We will have to adjust the parameters of its configuration to adapt to the standards of the creators of content. Especially to adapt to our concrete situation of visualization (lighting, the position of the television in the room, angle of vision, distance to which we sit down, etc.) since this last one influences the perceived quality of the image very much. It is something that the manufacturers cannot adjust in origin.
Calibration is done by modifying some of the predefined standard parameters such as brightness, contrast, or color gamut. As well as choose the most suitable display modes offered by the device for each specific environment and situation.
Calibration Options: Software And Hardware
Regarding calibration, there are different opinions. For most users, it will be enough to do it by themselves, guided by specific patterns and adjustment charts following some simple instructions. However, some say that it is best to leave everything as it comes standard and uses the preset display modes; others that it is necessary to calibrate with software and hardware such as probes, often using professionals.
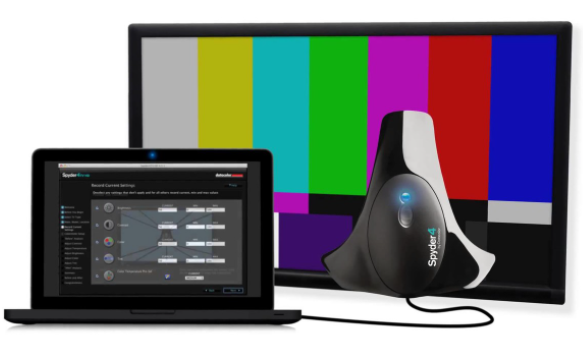
We have multiple options to calibrate our TVs, such as software for computers and cell phones, calibration discs, websites with ready-to-use presets, patterns, and online resources. With these options, we will be able to accurately detect the amount of light emitted by the TV, contrast levels, color saturation, etc. However, it implies an economic outlay that is not usually cheap – it can even exceed the TV price – although there are versions focused on home users somewhat cheaper.
Another possibility is to use DVD or Blu-ray discs designed explicitly for equipment calibration. They are usually easy to use through a series of images and videos. However, they ask us to retouch some aspects of our configuration until everything is calibrated. The downside is that they require an optical player – and in some cases – to buy them on the Internet, as they are usually difficult to find in regular stores.
The next and perhaps the most immediate option is to use the Web and its many free resources. For example, specific websites simulate special software with which to perform calibration. We also have many videos available on YouTube with basic patterns for calibration.
Some companies and websites specialized in installation offer configurations and calibration of equipment with a list of the “optimal” configurations for many models of televisions.
Tips Before Starting Calibration
After knowing the most common options for calibrating our TVs, we decide to do it by ourselves. But, first, we must consider the next:
- Start from the predefined modes of the TV. There are usually several for cinema, sports, games, conventional programming, etc., that can serve as a basis to finish touching up the different parameters by hand, so we do not have to start from scratch.
- Calibrate each video input in each HDMI port because different settings will be saved in one since the signal sources will offer different image quality.
- Make the adjustments in the usual viewing conditions. This involves positioning ourselves at the standard distance at which we will sit, at the standard angle(s), and with the typical ambient light that the room usually has.
- Keep two different presets, one for daily use with lots of light and another for watching TV at night and with low room illumination.
- In the first (with a lot of ambient light), we will probably have to raise the LED or OLED light level (which is not the same as brightness or contrast) above the average to have enough brightness, especially if we install the TV near a window.
- In the second case, and especially if we are going to watch series and movies, we will need to lower the panel’s backlight to get better blacks if our TV is LED and, in the case of OLED, to protect the life of the panel.
Basics Points To Be Adjusted
Performing a complete calibration with professional results is complex. Still, we can get very close and have good results by adjusting at least the parameters that we are going to discuss below.
- Brightness
The brightness level of the TV should not be confused with the level of illumination of the LED or OLED panel that we discussed earlier. Contrary to what it may seem, it oversees managing the depth of blacks and details in dark areas.
If we set this value too high, we will see that the image is dull, with colors as washed out, whitish, with blacks that look gray, and dark colors that are as if faded.
If we lower the brightness too much, we will lose details in the dark areas; in the shades of gray, and all the strength that technologies such as OLED can provide.
To adjust it, we must reproduce one of the recommended patterns in which squares or strips with different levels of shades close to black are shown. Next, we must adjust the brightness control of the TV to the minimum so that it looks all black. From that point on, we increase it little by little until we can differentiate correctly between the different frames, distinguishing all the transitions.
- Contrast
After brightness, it is time to adjust the contrast. It is related to the level of whites and total illumination in the image.
If we set it too high, we will have an image that will seem more impressive and vibrant. But we will be saturating the light areas, and we will lose details in the whites. Conversely, if we set this parameter too low, we will lose strength in the image with impoverished and unimpressive colors that shows low luminosity.
So, how do we adjust it? First, we set a pattern that shows boxes with colors of white tones, and we start by increasing the contrast of the TV to the maximum until we see everything very white without distinguishing the transitions. Then, we reduce the contrast until we can distinguish the transitions between the different shades.
- Color Temperature
The color temperature is a parameter that will completely modify the perception of the color range of the TV set, shifting it towards yellow or bluish tones. Normally, each brand sets several modes that it calls something like “warm”, “cold”, “warm 1.2”, “cold 1.2”, etc. We must choose the one that results in a temperature as close to 6,500 degrees Kelvin.
Suppose the setting menu allows us to choose directly numerically between several values. In that case, we select this 6,500 K. We can switch between the different values until the colors do not suffer any deviation towards yellowish or bluish tones in the whites.
- Color Saturation
If we leave the colors with little saturation, we will obtain an image without strength, washed-out and whitish. On the contrary, if we overdo it, we will have a very oversaturated image in which we will lose color intervals and chromatic range.
There are some basic patterns that we can follow, such as the one above these lines, in which we must be able to differentiate the different colors separately and within each bar the different shades of the boxes. If there are two or more areas in which we cannot identify a color gradient, we will probably have an excess of saturation in that color that we will have to correct from the corresponding TV menu.
- Sharpness
Sharpness is the parameter that controls the maximum detail in the micro-information of the TV image. Setting this control to a low level will give us the sensation that it is blurred. On the other hand, if we go too high and increase the sharpen to the maximum, we will see much better details in the textures, the clothes, the faces, the letters, contours of the figures, etc.
To adjust it, we can use a pattern like the one we propose here with horizontal and vertical lines of text of different sizes and vary the TV’s sharpness control until we get a good detail but without the defects described above.
Final Lines on Philips 55PFL5601/F7 Best Picture Settings
As we mentioned, before you can start enjoying your new screen to the fullest, you will need to calibrate some of its parameters so that they adapt as well as possible to the standards of the creators of content and especially to our concrete situation of visualization.
Here, we explained how the calibration is done by modifying predefined standard parameters such as brightness, contrast, sharpness, color temperature, and saturation.
More Posts for You:

